와이파이가 연결 가능한 esp8266을 이용하여 물리적 움직임이 포함된 스마트 스위치를 만들어 보았다. 시간이 오래 걸릴 줄 알았는데 생각보다 간단하게 만들 수 있었다.
준비물
1. 와이파이가 가능한 마이크로컨트롤러.
2. 스위치를 만들기 위한 모터
3. 전원공급 배터리
4. 양면테이프
재료 준비하기
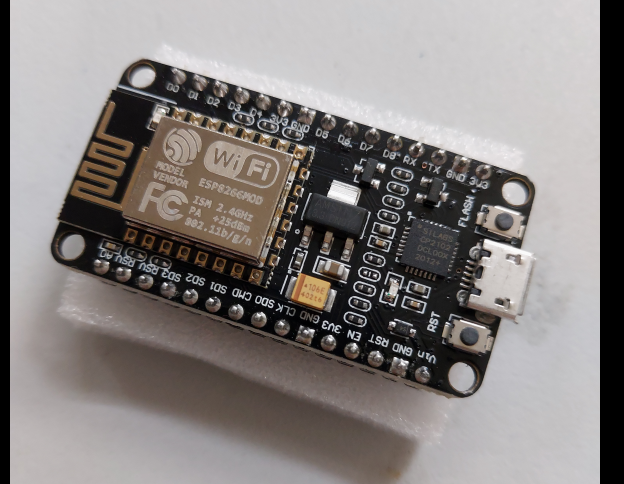
와이파이가 가능한 마이크로컨트롤러를 생각했을 때 처음 생각난 것이 아두이노 나노였다. 하지만 아두이노 나노에서 와이파이를 이용하기 위해서는 모듈을 따로 구입해야 해서 비용이 늘어났다. 그러던 중 ESP8266 NodeMCU CP2102 모듈은 1만 원 이하이면서 와이파이가 가능하고 아두이노 IDE를 통해서 프로그래밍할 수 있었다.
모터의 경우에는 서보모터가 일반적인데 버튼을 누를 때 필요한 힘이 얼마나 필요한지 몰라서 집에 있던 가장 기본적인 서보모터인 sg-90을 일단 사용해보았다.

배터리의 경우에는 esp8266의 마이크로 usb를 통해서 계속 연결할 계획이어서 따로 구매하진 않았다. esp8266은 7~12V의 외부 전원을 넣을 수 있기 때문에 휴대성을 고려한다면 배터리를 따로 연결하면 될 것 같다. [1]
양면테이프는 모터가 버튼을 누를 때 서보 모트를 고정할 때 필요하다.(집에 없는 경우가 많아 미리 준비해야 한다)
만들기
먼저 esp8266을 아두이노 IDE에서 사용할 수 있도록 아두이노 IDE를 설치하고 업데이트해준다.
https://www.arduino.cc/en/software
Software
Open-source electronic prototyping platform enabling users to create interactive electronic objects.
www.arduino.cc
자신의 컴퓨터에 맞는 파일을 다운로드하면 된다.

아두이노를 설치한 후에 esp8266을 사용하기 위해 보드를 업데이트해줘야 한다.
1. 파일에서 환경설정으로 들어간다.

2. 환경설정에서 추가적인 보드 매니저 URLs에 다음과 같은 주소를 입력하고 확인을 누른다.
https://dl.espressif.com/dl/package_esp32_index.json, http://arduino.esp8266.com/stable/package_esp8266com_index.json

3. 다시 아두이노에서 툴- 보드 - 보드 매니저를 선택한다.

4. 보드 매니저에서 esp8266을 검색하여 설치한다.

5. 설치가 끝나면 다시 툴 - 보드 - esp8266 board - nodeMCU 1.0 esp-12E 모듈을 선택해준다.

6. 다음은 컴퓨터와 esp8266을 마이크로 USB를 이용해서 연결해준다.
7. 아두이노에서 툴 - 포트에서 연결된 COM을 선택해준다.

8. esp8266과 연결된 COM이 어떤 포트인지 확인하기 위해서는 컴퓨터 관리(내 컴퓨터 아이콘-관리)에서 장치 관리자를 보면 포트(COM&LPT)에 연결된 것을 확인할 수 있다.

내 컴퓨터에서 연결하니 다음과 같이 COM5항목이 새로 생겼다.

9. 처음 esp8266을 연결하면 새로 생기는 COM5이 없고 시리얼 포트를 찾을 수 없다는 오류 메시지가 나올 수도 있다.

다시 장치 관리자를 살펴보면 CP2102 usb to UART bridge controller에 오류 메시지가 나와있는 것을 볼 수 있다. USB에서 UART(범용 비동기화 송수신기) 장치로 데이터를 전송하는데 문제가 생겨서 esp8266을 컴퓨터가 인식할 수 없는 상태이다.

그래서 CP2102 usb to UART bridge controller를 인식할 수 있는 드라이버를 설치해준다.
https://www.usb-drivers.org/cp2102-usb-to-uart-bridge-driver.html
CP2102 USB to UART Bridge Driver - USB Driver
The CP2102 USB to UART Bridge driver you can download below. Silicon Labs who manufactures the CP210
www.usb-drivers.org
설치가 끝나면 오류메시지가 없어지고 정상정으로 esp8266이 포트에 연결된 것을 확인할 수 있다.
10. 코딩하기
코드는 esp8266에 내장된 WifiManualWebServer예제를 살짝 변형하여 만들었다.
esp8266wifi 라이브러리와 servo 라이브러리를 사용한다. 코드에서 변경할 부분 wifi name과 wifi password 그리고 서보모터가 움직이는 각도(servo.write(숫자) 숫자를 조절하면서 서보모터가 얼마나 움직이는지 확인한다)를 사용자에 맞게 설정한다.
/*
    This sketch demonstrates how to set up a simple HTTP-like server.
    The server will set a GPIO pin depending on the request
      http://server_ip/gpio/0 will set the GPIO2 low,
      http://server_ip/gpio/1 will set the GPIO2 high
    server_ip is the IP address of the ESP8266 module, will be
    printed to Serial when the module is connected.
*/

#include <ESP8266WiFi.h>
#include <Servo.h>

#ifndef STASSID
#define STASSID "WIFI name"
#define STAPSK  "WIFI password"
#endif

const char* ssid = STASSID;
const char* password = STAPSK;

// Create an instance of the server
// specify the port to listen on as an argument
WiFiServer server(80);
Servo servo;

void setup() {
  Serial.begin(115200);

  // prepare LED
  pinMode(LED_BUILTIN, OUTPUT);
  digitalWrite(LED_BUILTIN, 0);


  delay(2000);

  // Connect to WiFi network
  Serial.println();
  Serial.println();
  Serial.print(F("Connecting to "));
  Serial.println(ssid);

  WiFi.mode(WIFI_STA);
  WiFi.begin(ssid, password);

  while (WiFi.status() != WL_CONNECTED) {
    delay(500);
    Serial.print(F("."));
  }
  Serial.println();
  Serial.println(F("WiFi connected"));

  // Start the server
  server.begin();
  Serial.println(F("Server started"));

  // Print the IP address
  Serial.println(WiFi.localIP());
}


void loop() {
  // Check if a client has connected
  WiFiClient client = server.available();
  if (!client) {
    return;
  }
  Serial.println(F("new client"));

  client.setTimeout(5000); // default is 1000

  // Read the first line of the request
  String req = client.readStringUntil('\r');
  Serial.println(F("request: "));
  Serial.println(req);

  // Match the request
  int val;
  if (req.indexOf(F("/gpio/0")) != -1) {
    val = 0;
    servo.attach(5);
    delay(1000);
    servo.write(90);
    delay(1000);
    servo.detach();
    delay(1000);
  } else if (req.indexOf(F("/gpio/1")) != -1) {
    val = 1;

    servo.attach(5);
    delay(1000);
    servo.write(0);
    delay(1000);
    servo.write(90);
    delay(1000);
    servo.detach();
    delay(1000);
  } else {
    Serial.println(F("invalid request"));
    val = digitalRead(LED_BUILTIN);
  }

  // Set LED according to the request
  digitalWrite(LED_BUILTIN, val);

  // read/ignore the rest of the request
  // do not client.flush(): it is for output only, see below
  while (client.available()) {
    // byte by byte is not very efficient
    client.read();
  }

  // Send the response to the client
  // it is OK for multiple small client.print/write,
  // because nagle algorithm will group them into one single packet
  client.print(F("HTTP/1.1 200 OK\r\nContent-Type: text/html\r\n\r\n<!DOCTYPE HTML>\r\n<html>\r\nGPIO is now "));
  client.print((val) ? F("high") : F("low"));
  client.print(F("<br><br>Click <a href='http://"));
  client.print(WiFi.localIP());
  client.print(F("/gpio/1'>here</a> to turn on/off air conditioner <a href='http://"));
  client.print(WiFi.localIP());
  client.print(F("/gpio/0'>here</a> nothing happened</html>"));

  // The client will actually be *flushed* then disconnected
  // when the function returns and 'client' object is destroyed (out-of-scope)
  // flush = ensure written data are received by the other side
  Serial.println(F("Disconnecting from client"));
}
11. esp8266과 서보모터 연결하기
서보모터에서 전선의 색은 각각
갈색 = GND 그라운드
빨강 = 3.3V
주황 = 신호
가 입력되는 선이다. 그래서 각각의 선을 esp8266의 GND,3V3 그리고 D1(신호가 입력되는 GPIO(5)이다. 위의 코드에서 servo.attach(5) 5번 입력단자) 선에 연결해준다. [3]

12. 아두이노 오른쪽 시리얼 모니터를 누르고 시리얼 모니터의 오른쪽 아래 보드 레이트(통신속도)를 esp8266이 사용하는 115200으로 맞춰준다. 그다음 코드를 업로드해주면 시리얼 모니터에 로컬 ip 주소가 나오게 되는데 그 아이피 주소로 들어가면 esp8266에 접속할 수 있다.

13. 아이피 주소를 인터넷 창에 입력하고 들어가면 다음과 같이 나오는데 하이퍼링크 되어있는 here를 누르게 되면
아이피 주소/gpio/1 혹은 아이피 주소/gpio/0로 접속된다.

코드의 다음 부분처럼 val 값에 0이나 1이 들어왔을 때 서보모터가 연결되고 write(회전 값)을 받으면서 움직인 게 된다.

14. 아이피 주소를 바로가기로 만들어 놓으면 단축키를 지정해서 바로 에어컨을 실행시킬 수 있고 핸드폰에서도 인터넷으로 연결하면 똑같은 웹페이지가 나오면서 에어컨을 실행시킬 수 있다.


15. 작동 영상
후기
인터넷에 접속해서 반응하도록 코딩하는 것이 까다로울 것 같았는데 기본 예제가 있어서 쉽게 만들 수 있었다. 조금만 응용한다면 다양한 물건들을 제어할 수 있을 것 같다.
마이크로 USB를 사용하지 않고 배터리를 사용한다면 esp8266이 항상 wifi에 연결되어있으면 배터리를 빨리 소모하기 때문에 sleep모드로 전환했다가 대기하고 신호가 갈때만 작동하도록 만들어야할 것 같다. [4]
구매링크
[파츠키츠] NodeMCU V2 CP2102 ESP8266 ESP-12E WiFi 펌웨어 Lua 아두이노
COUPANG
www.coupang.com
아두이노 마이크로 서보모터 SG90
COUPANG
www.coupang.com
“파트너스 활동을 통해 일정액의 수수료를 제공받을 수 있음"
참고자료
[1] 배터리 선택하기
https://diyi0t.com/best-battery-for-esp8266/
The best battery for ESP8266 microcontrollers
In this article we analyze in total 5 batteries for their technical characteristics to find the best battery for ESP8266 microcontrollers.
diyi0t.com
[2] esp8266과 서보모터 연결하기
https://www.youtube.com/watch?v=tlgLA-PT5eE
서보모터 테스트코드
#include <Servo.h>

Servo servo;

void setup() {
  servo.attach(5); //D1 에 연결
  servo.write(0); //초기값 0

  delay(2000);
}

void loop(){
  servo.write(90); //90만큼회전
  delay(1000);

  servo.write(0); //다시 0으로 원위치
  delay(1000);
}
[3] esp8266 데이터시트
https://components101.com/development-boards/nodemcu-esp8266-pinout-features-and-datasheet
NodeMCU ESP8266 Pinout, Specifications, Features & Datasheet
NodeMCU ESP8266 is an open-source Lua based firmware and development board targeted for IoT applications.
components101.com
[4] 슬립모드
https://randomnerdtutorials.com/esp8266-deep-sleep-with-arduino-ide/
ESP8266 Deep Sleep with Arduino IDE (NodeMCU) | Random Nerd Tutorials
This guide shows what’s Deep Sleep and how to use it with ESP8266 (NodeMCU) in Arduino IDE. If you use the sleep functions with the ESP8266 it will save you power
randomnerdtutorials.com
esp8266을 이용한 전등 스위치봇 만들기
https://kyoungin90.tistory.com/309
공대생 감성 아두이노 스마트 전등 스위치봇 만들기
밤에 자기 전 전등 스위치를 끄러 움직이는 것은 귀찮은 일이다. 그래서 스마트 스위치를 검색하면 크게 세 종류의 스마트 스위치를 찾아볼 수 있다. 1. 전등에 스위치를 연결하여 원하는 곳에
kyoungin90.tistory.com
'만들기' 카테고리의 다른 글
| [아두이노 CNC 만들기] 만든지 오래되서 기억이 잘 안나지만... 일단 남깁니다 ㅠ (0) | 2020.07.14 |
|---|---|
| [02 아두이노CNC만들기] Z축 지지대 만들기 (0) | 2020.07.14 |
| [01 아두이노 cnc 만들기] CD롬 분리하기 (0) | 2020.07.14 |
| 아두이노를 이용한 미니CNC 만들기 시작 (0) | 2020.07.14 |
| 3D프린터로 만든 DSLR 핫슈커버 (0) | 2019.04.23 |


